Proper James Hardie siding installation hinges on diligently following the official installation manual; many installers unfortunately deviate from best practices, impacting longevity.
Understanding Hardie Siding Materials
James Hardie siding isn’t wood; it’s fiber cement, demanding specific tools and techniques. Unlike traditional materials, it requires priming of all cut edges to prevent moisture absorption and premature deterioration. Ignoring this crucial step compromises the siding’s integrity.
Understanding the material’s composition is vital. It’s heavier than vinyl, necessitating appropriate nailing procedures and support. The installation manual details correct fastener schedules and spacing. Furthermore, proper flashing behind gaps isn’t merely recommended—it’s essential to prevent water intrusion.
Incorrect installation, often seen in practice, can negate the product’s warranty and lead to costly repairs.
Importance of Following the Installation Manual
The James Hardie installation manual isn’t a suggestion; it’s a blueprint for a durable, warranted installation. Many installers, despite charging premium rates, reportedly bypass crucial steps outlined within. This disregard for best practices often leads to issues like moisture damage, particularly in chipped boards that readily absorb water.
Adhering to the manual ensures correct flashing installation behind gaps – a critical defense against water intrusion. It also specifies the use of abrasive countersinking bits for proper fastener depth, preventing future problems.
Ignoring the manual risks voiding the warranty and incurring significant repair costs. It’s a homeowner’s best defense against subpar workmanship.

Preparation Before Installation
Thorough preparation is key: inspect boards for damage, prime all cut edges immediately, and verify correct house wrap installation – gaps indicate errors.
Checking for Damaged Boards
Before commencing installation, a meticulous inspection of each James Hardie board is absolutely crucial. Look closely for any signs of damage incurred during shipping or handling. This includes chips, cracks, or warping, even seemingly minor imperfections. Damaged boards compromise the integrity and aesthetic appeal of the finished siding.
It’s vital to reject or replace any boards exhibiting such flaws. Ignoring damage can lead to premature deterioration, particularly concerning moisture absorption in chipped areas. Addressing this upfront saves significant headaches and costly repairs down the line. Document any damage for potential claims with the supplier. A proactive approach ensures a flawless and durable siding installation.
Priming Cut Edges
A frequently overlooked, yet critically important step in James Hardie installation is priming all cut edges of the siding. When boards are cut to fit, the exposed edges are vulnerable to moisture absorption, leading to swelling, delamination, and ultimately, premature failure. The factory coating doesn’t extend to these freshly cut surfaces.
Always apply a high-quality, fiber cement-specific primer to every exposed edge immediately after cutting. This seals the core material, preventing water ingress and maintaining the siding’s structural integrity. Failure to prime voids the warranty in many cases, so don’t skip this essential step. Proper priming extends the life and performance of your James Hardie investment.
Ensuring Proper House Wrap Installation
Correct house wrap installation is foundational to a successful James Hardie siding project. A continuous, weather-resistant barrier prevents water intrusion while allowing moisture vapor to escape from within the wall assembly. However, visible house wrap during installation indicates a significant error – it should be completely concealed by the siding.
Gaps or improper overlaps in the house wrap compromise its effectiveness. Ensure proper lapping sequences and secure fastening to prevent wind-driven rain from penetrating. The siding should fully cover the house wrap, creating a watertight seal. Addressing this early avoids costly repairs later. Prioritize a flawless wrap installation for long-term protection and performance.
Installation Techniques
Critical techniques include proper flashing behind gaps, utilizing abrasive countersinking bits for flush nailing, and adhering to precise nailing schedules for secure attachment.
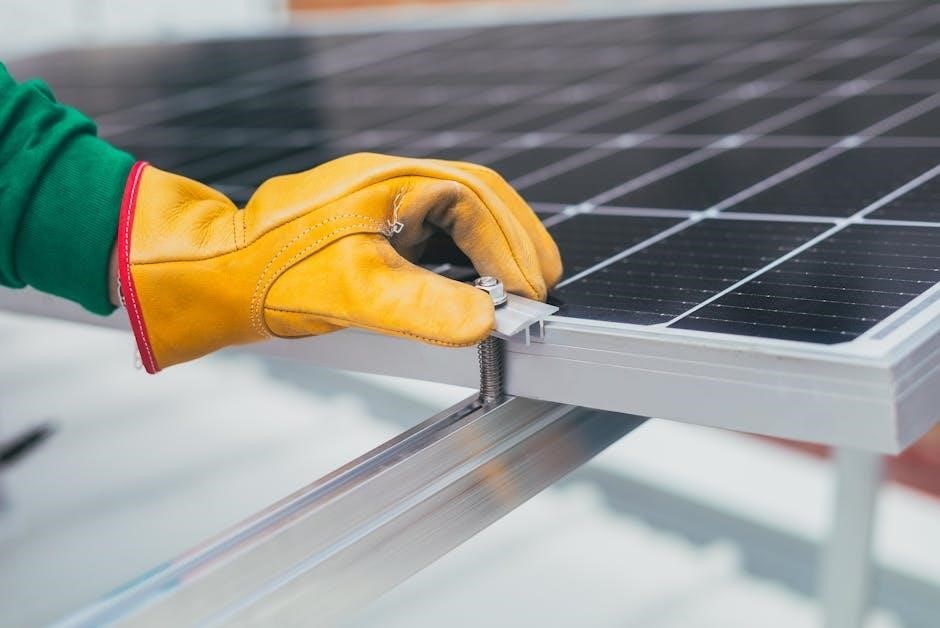
Flashing Behind Gaps – A Critical Step
Ensuring metal flashing is installed correctly behind all gaps is paramount to a durable and weather-resistant James Hardie siding installation. This often-overlooked detail prevents water penetration, which can lead to significant structural damage over time. The flashing acts as a crucial barrier, diverting water away from the house wrap and framing.
Many installers skip this step, prioritizing speed over quality, but it’s a fundamental requirement outlined in the Hardie installation manual. Proper overlap and secure fastening of the flashing are essential. Ignoring this can void warranties and create costly repairs down the line. Always verify the presence of flashing during inspections, as it’s frequently missed.
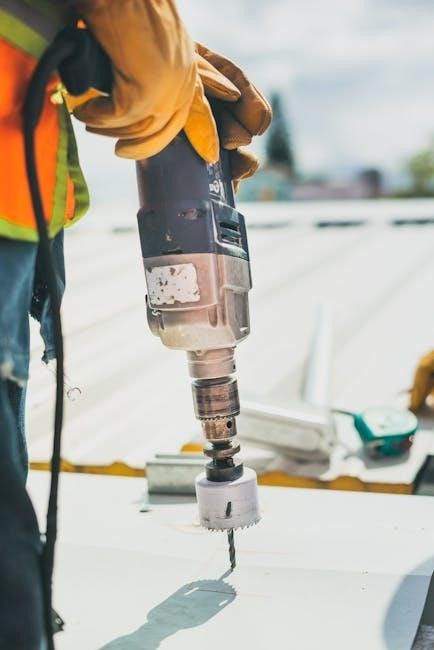
Using Abrasive Countersinking Bits
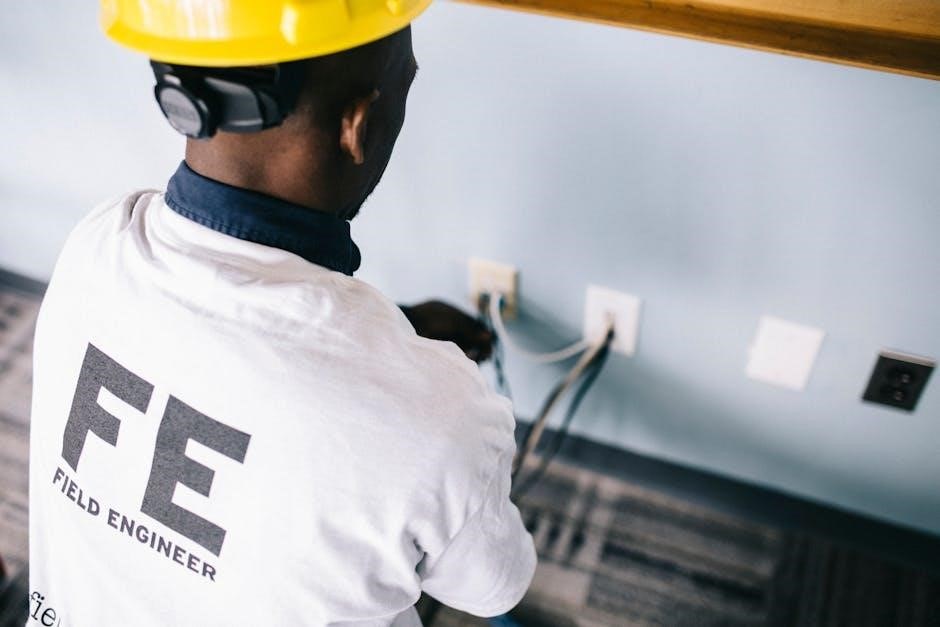
When installing James Hardie siding, achieving properly countersunk nail heads is vital for a clean, professional finish and to maintain the siding’s integrity. Standard drill bits often chip or crack the fiber cement material. This is where abrasive countersinking bits – sometimes diamond-tipped – become essential.
These specialized bits gently grind away material, creating a smooth recess for the nail head without causing damage. Finding the right bit can be challenging, but they are readily available. Using the correct technique prevents unsightly nail pops and ensures the siding lies flat. Refer to the Hardie installation manual for recommended bit types and proper countersinking depth for optimal results and warranty compliance.
Correct Nailing Procedures
Adhering to precise nailing procedures is paramount when installing James Hardie siding, directly impacting its weather resistance and longevity. The Hardie installation manual specifies the correct nail type – typically stainless steel – and precise nailing location relative to the siding’s overlap.
Nails must be driven straight and to the correct depth, utilizing the previously prepared countersunk holes created with abrasive bits. Overdriving or underdriving nails compromises the siding’s performance. Proper nail spacing, as outlined in the manual, ensures adequate support and prevents buckling. Ignoring these details can void the warranty and lead to premature failure, highlighting the importance of meticulous execution.

Avoiding Common Installation Errors
The Hardie manual explicitly advises against using caulk, as it restricts siding movement; chipped boards require attention to prevent moisture absorption and premature deterioration.
Why Caulk is Not Recommended

Historically, caulk was frequently used during siding installations, but James Hardie’s current installation guidelines strongly discourage its application. This shift stems from a fundamental understanding of how fiber cement siding interacts with environmental factors. Siding needs to expand and contract with temperature and humidity changes; caulk restricts this natural movement, creating stress points.
Over time, this restricted movement can lead to cracking, warping, or even complete failure of the siding boards. The Hardie manual emphasizes the importance of allowing the siding to “breathe” and move independently. Instead of caulk, proper flashing techniques and appropriate overlapping of boards are recommended to create a watertight seal while accommodating natural expansion and contraction. Ignoring this guidance can void warranties and lead to costly repairs down the line.
Addressing Moisture Absorption in Chipped Boards
Even with careful handling, James Hardie siding boards can sometimes sustain minor chips or damage during installation. While seemingly insignificant, these imperfections present a vulnerability to moisture absorption, potentially leading to premature deterioration. Fiber cement, while durable, isn’t impervious to water damage, especially when exposed through chipped edges.
The Hardie installation manual mandates immediate priming of all cut edges and any chipped areas. This priming process seals the exposed fibers, preventing water from penetrating the board’s core. Unsealed chips can swell, crack, and compromise the siding’s structural integrity. Promptly addressing these imperfections ensures long-term performance and maintains the warranty validity. Ignoring this step invites costly repairs and diminishes the siding’s lifespan.
Tools and Resources
James Hardie provides comprehensive installation instructions online, readily accessible for installers and DIY enthusiasts; siding experts like Northville Lumber offer guidance.
Locating James Hardie Installation Instructions Online
Finding the correct James Hardie installation manual is crucial for a successful project. The official documentation is easily accessible through the James Hardie website, offering detailed guidance for various product lines like HardiePlank. These resources cover everything from preparation and tool selection to step-by-step installation procedures and crucial details regarding flashing and proper nailing techniques.
It’s important to download the manual specific to your siding product, as installation methods can vary. Beyond the official site, many building supply retailers, including those recommended by experts, often provide links or downloadable PDFs of the manuals. Always prioritize the latest version to ensure compliance with current best practices and warranty requirements. Referencing these online resources empowers installers to avoid common errors and achieve a durable, aesthetically pleasing result.
Utilizing Siding Expert Advice (e.g., Northville Lumber)
Navigating James Hardie installation can be complex, making expert advice invaluable. Companies like Northville Lumber specialize in siding and offer a wealth of knowledge beyond the installation manual. Their experienced staff can assist with product selection, ensuring compatibility with your project’s needs, and clarify any ambiguities within the official documentation.
They can also provide insights into local climate considerations and common installation challenges. Don’t hesitate to leverage their expertise to avoid costly mistakes and ensure a professional finish. Siding experts often stay updated on the latest techniques and can recommend appropriate tools and accessories. Consulting with professionals like those at Northville Lumber complements the manual, leading to a superior and long-lasting installation.
Step-by-Step Installation Overview
A successful installation begins with careful design considerations, followed by a complete process detailed in available video resources, referencing the manual.
Design Phase Considerations
Before commencing installation, meticulous planning is crucial. Carefully review the James Hardie installation manual for guidance on layout and aesthetic choices. Consider the desired overlap of HardiePlank, ensuring proper exposure aligns with manufacturer specifications. Account for window and door trim details, planning for accurate flashing integration – a critical step to prevent moisture intrusion.
Visualize the finished product, factoring in architectural styles and potential challenges posed by the home’s existing structure. Proper planning minimizes waste and ensures a seamless, professional finish. Don’t underestimate the importance of accurate measurements and a detailed cut list derived from the manual’s guidelines. This proactive approach sets the stage for a successful and durable siding installation.
Complete Installation Process (Video Resources)
Visual learning is invaluable when tackling James Hardie siding installation. Numerous video resources demonstrate the complete process, from initial design considerations to the final nail. One helpful video walks through every stage, emphasizing the importance of adhering to the Hardie installation manual. These resources showcase proper techniques for handling materials, cutting, and fastening, offering a practical complement to the written instructions.
Seek out videos detailing flashing installation, a frequently overlooked but vital step. Observe demonstrations of abrasive countersinking bit usage for a professional finish. Remember, the manual is your primary guide, and videos should reinforce, not replace, its instructions. Utilize these visual aids to gain confidence and ensure a high-quality, long-lasting siding installation.

Troubleshooting Installation Issues
Incorrect installations are common, yet the Hardie manual provides solutions; diligently referencing it is crucial for addressing errors and ensuring proper siding performance.
Dealing with Incorrect Installations
Discovering an incorrect James Hardie siding installation can be frustrating, but addressing it promptly is vital to prevent long-term damage. The first step is a thorough review of the official installation manual – become intimately familiar with the correct procedures. Document all discrepancies meticulously, noting deviations from the manual’s guidelines with photos and detailed descriptions.
Then, confront the installer with your findings, referencing specific sections of the manual. Be prepared to advocate for corrections, holding them accountable to industry best practices. If a resolution isn’t reached, consider seeking a second opinion from a siding expert, like those at Northville Lumber, to validate your concerns and potentially mediate a solution. Remember, a properly installed Hardie siding system is a long-term investment, and correcting errors now will save significant costs later.
Addressing TikTok/Social Media Related Issues (Irrelevant, but mentioned in source)
While seemingly unrelated to proper installation, discussions on platforms like TikTok highlight a concerning trend: misinformation and potentially harmful DIY advice regarding James Hardie siding. Users share videos, sometimes demonstrating incorrect techniques or overlooking crucial steps outlined in the official installation manual. This underscores the importance of verifying information found on social media against the manufacturer’s guidelines.
Furthermore, concerns regarding data privacy and platform restrictions (specifically relating to Chinese SIM cards and access) are circulating, but remain entirely separate from the core issue of correct siding installation. Always prioritize the official Hardie manual and expert advice over anecdotal evidence found online, ensuring a durable and properly protected home exterior.

Advanced Installation Details
HardiePlank requires specific techniques, detailed in the manual, for optimal performance and longevity; proper countersinking with abrasive bits is crucial for a seamless finish.
HardiePlank Specifics
Successfully installing HardiePlank siding demands meticulous attention to detail, as outlined in the James Hardie installation manual. A critical aspect involves ensuring metal flashing is correctly positioned behind all gaps to prevent moisture intrusion – caulk is no longer the recommended solution for sealing these areas.
Furthermore, all cut edges of the HardiePlank boards must be primed immediately after cutting to maintain the siding’s integrity and prevent premature deterioration from moisture absorption, especially if chipping occurs. Utilizing abrasive countersinking bits is also essential for achieving flush nail heads and a professional finish. Remember, incorrect installations are surprisingly common, so verifying adherence to the manual is paramount.
TikTok Cross-Border E-commerce (Irrelevant, but mentioned in source)
While seemingly unrelated to Hardie siding installation, discussions surrounding TikTok and cross-border e-commerce highlight a broader concern: verifying information sources. Just as users question TikTok’s data practices and access restrictions (particularly regarding SIM cards and eSIM compatibility), homeowners should critically evaluate installation quality.
The source material’s inclusion of TikTok issues underscores the importance of independent verification. Don’t rely solely on installers’ claims; consult the official James Hardie installation manual and seek expert advice, like that offered by Northville Lumber. Ensure proper flashing, priming, and nailing techniques are employed, avoiding shortcuts like relying on caulk. Thoroughness prevents costly repairs later.